Sewing Areas for Small Spaces That Feel Bigger and Smarter
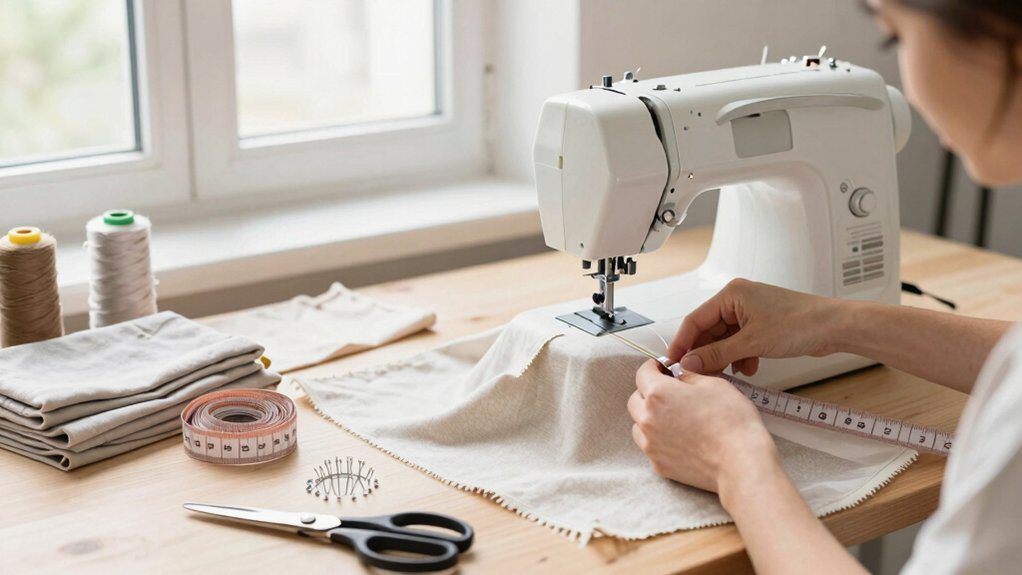
I make small sewing spots feel bigger by putting the machine near a bright window, adding a slim table, and using a clear lamp so my eyes don’t squint—easy, cheap, and yay, less chaos! Then I stash thread, scissors, and mats on wall shelves, pegboards, or a rolling cart, so the floor stays open. A fold-down desk or hidden closet nook can be a tiny magic trick, and there’s even smarter stuff to try next.
Love cozy DIY projects? 💕
Get free printable guides, exclusive tutorials & surprise craft goodies straight to your inbox.
Disclosure: This post may contain Amazon affiliate links, at no extra cost to you. Content on DiyCraftNest is created with research support from AI tools and carefully reviewed, edited, and fact-checked by the lead author, Daniel Pat, to ensure accuracy and reliability. Learn more
Key Takeaways
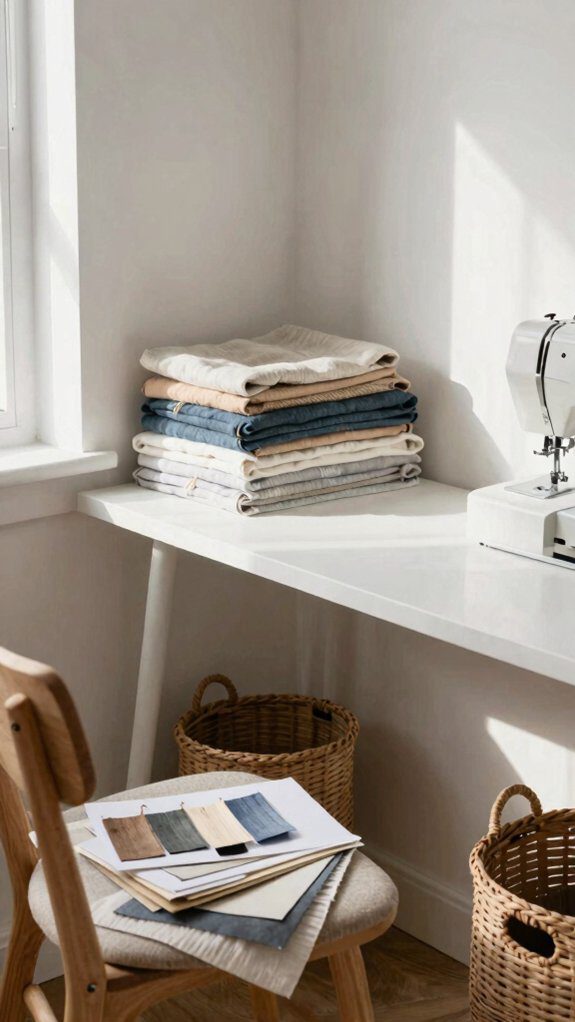
- Use a bright window, task lamp, and clear tabletop to make a 4–6 square-meter sewing nook feel larger and more usable.
- Choose corner or closet layouts with a 90–100 cm deep work surface to fit a machine without crowding the room.
- Add wall-mounted pegboards, shelves, and behind-door organizers to keep tools visible, tidy, and within easy reach.
- Pick fold-down tables, rolling carts, and caster cabinets so sewing stations can disappear when not in use.
- Store bulky items in under-bed bins, hidden cabinets, or slim carts to reduce clutter and improve flow.
Why Small Spaces Can Still Be Functional
In a tiny sewing nook, I’ve found that “small” doesn’t have to mean “cramped” at all—it can actually work really well! With efficient layouts, I keep my machine near light, use a slim cart, and let wall shelves do the heavy lifting. That leaves the table clear, my scissors easy to grab, and my brain a lot calmer.
I also love sensory comfort: bright task lighting, natural light, and less clutter help my eyes relax and my room feel bigger. The best part? Even a 4-square-meter space can feel friendly, useful, and totally mine.
Layout Ideas That Maximize Every Inch
I love squeezing a sewing setup into a tight spot, and corner layouts can make a room feel surprisingly roomy—just tuck your machine by a bright window, keep a cutting surface nearby, and you’re off to a great start!
If you’ve got a closet or little nook, I can show you how a simple countertop, a light, and a few shelves can turn it into a tidy mini studio without breaking the bank.
And wait until you see wall-mounted stations, because they free up floor space fast and still keep your tools right where you need ’em—pretty neat, right?
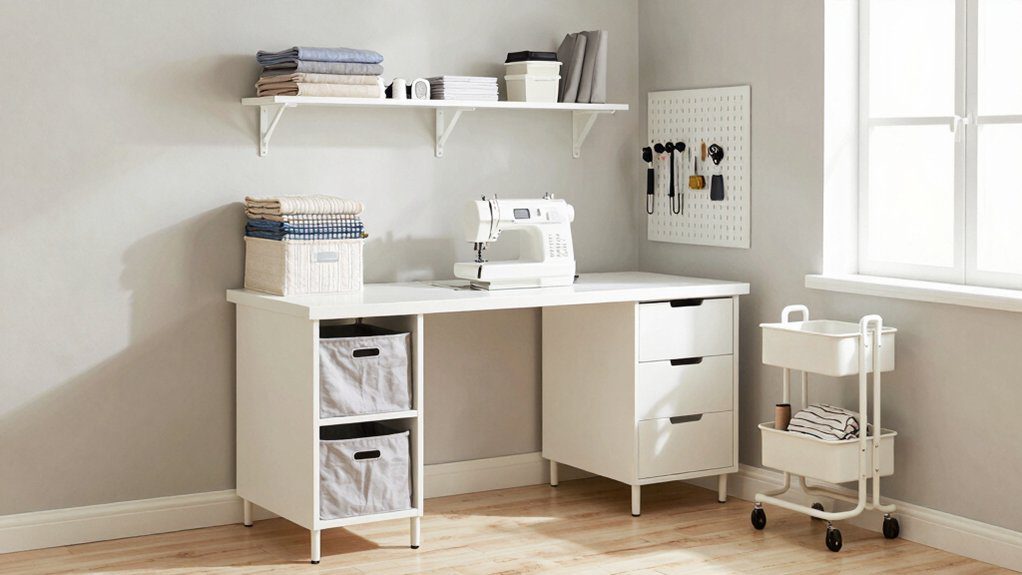
Corner setups
When I’m squeezing a sewing area into a tight room, I always start with the corner, because it’s practically free real estate for your creativity! I tuck my machine into a sunny nook by the window, add a 90 cm-deep table, and suddenly the whole room feels calmer.
For extra space, I use a fold-down wall board and a portable ironing spot, so cutting and pressing don’t crowd my feet.
Then I go vertical, with pegboards or slim shelves for rulers and fabric.
If I want a real upgrade, I anchor the corner with a rolling cart and a small desk—easy, cheap, and delightfully tidy.
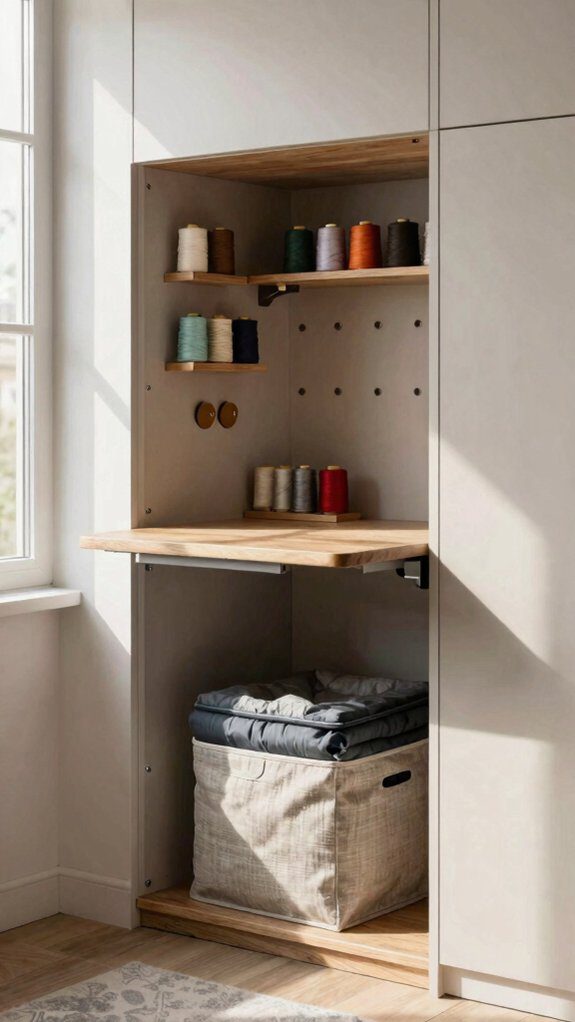
Closet conversions
Because closets already have walls and a door, I love turning a reach-in closet into a tiny sewing hideaway—it’s like finding a secret room! I add a 24–30″ counter, then tuck slim carts below so thread, mats, and stabilizers stay close.
- Shelf it up: adjustable shelves hold bolts and bins.
- Hang it smart: pegboard keeps scissors and rulers in sight.
- Light and air: a daylight lamp and vent help with closet acoustics and fabric dyeing fumes.
If the closet’s shallow, I use a pull-out shelf. It’s cheap, cozy, and wow, it really works!
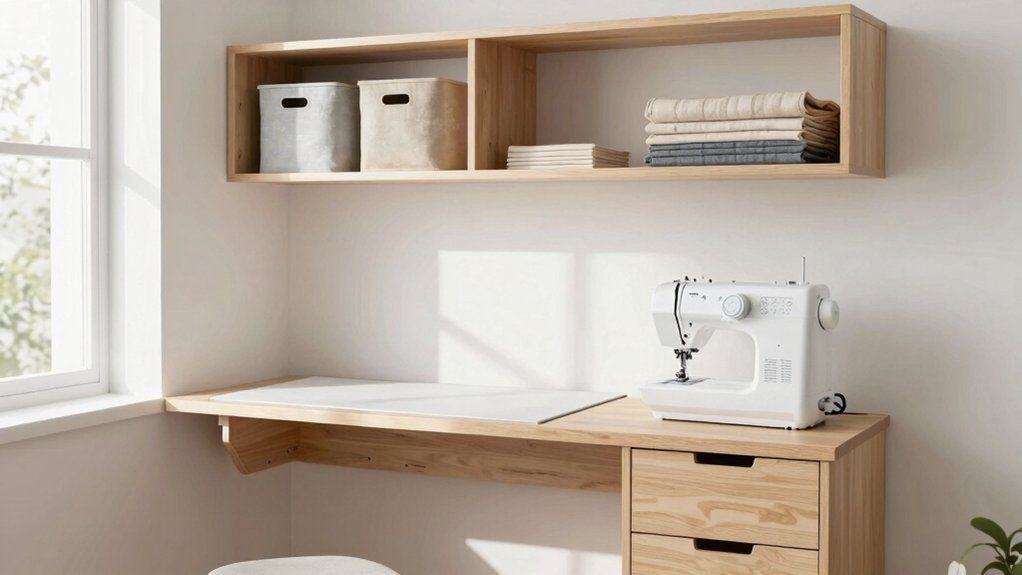
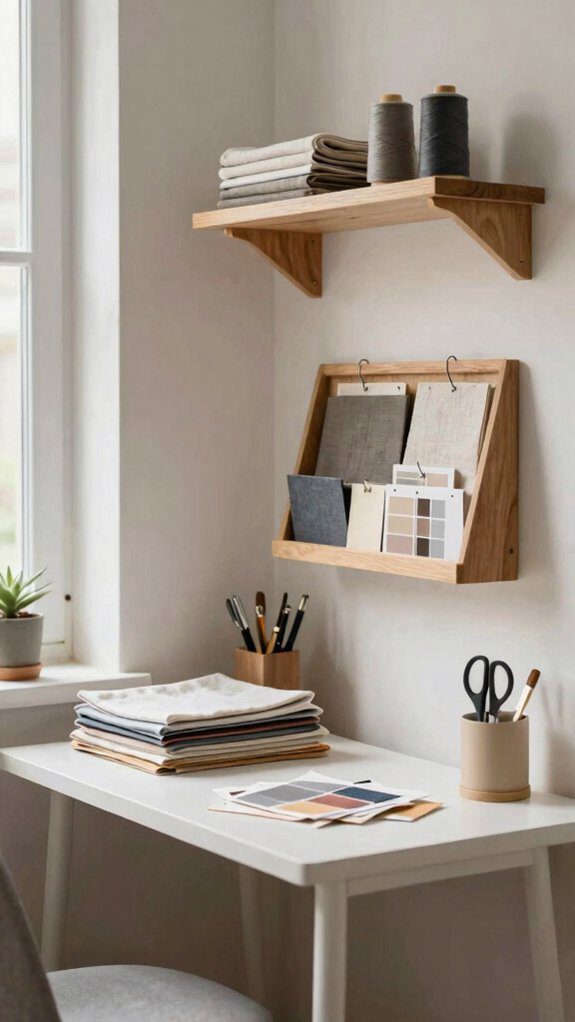
Wall-mounted stations
Wall-mounted sewing stations are my favorite trick for tiny rooms, since they turn a plain wall into a real work zone without hogging the floor—pretty neat, right? I use space saving hardware, and the vertical workflow feels so smart.
| Idea | Result |
|---|---|
| Fold-down table | Full surface, then flat wall |
| Pegboard above | Tools stay within reach |
| Slim shelves below | Thread, mats, bins tucked away |
I hang a 90–100 cm table, add a pegboard, then slide a mat into a narrow slot. Near a window, with a sheer blind and LED lamp, it’s bright, easy, and honestly, kind of magical!
Furniture That Works Double Duty
I love furniture that pulls double duty, because in a small sewing space, every piece has to earn its keep!
A foldable table can give you a roomy cutting spot when you need it, then disappear like magic, while a storage ottoman or rolling cart keeps fabric, notions, and WIPs tucked away without stealing floor space.
And if you want the sneakiest win of all, a convertible desk can flip from neat office mode to a comfy sewing station, so you get two setups from one smart piece.
Foldable tables
Flip up a fold-down table and, just like that, your sewing spot appears out of thin air—magic, but with screws!
I love how wall mounted islands and portable ironing surfaces keep my tiny room feeling friendly, not cramped.
Try this:
- Pick a sturdy model with pegboard or cubbies for tools.
- Use heavy-duty hinges, or a folding leg, so your machine feels safe.
- For renters, I’d choose French cleats and a slim cart underneath.
When I need cutting room, I open mine to 90 cm, then fold it back and grin—my floor comes home again!
Storage ottomans
Ottoman-hero furniture is one of my favorite tiny-room tricks, because it can hide a whole sewing stash and still give you a place to sit—talk about earning its keep!
I look for storage ottomans with 18–24 inches of depth, a firm lid, and a 250-pound-plus load rating, so I can perch, press, or pause without wobble.
I love fabric ottomans and tufted benches with hinged lids, because bins inside keep notions, WIPs, and rulers from vanishing. Try a slim, rectangular style against a wall, or one on casters, and you’ll get extra work space plus that cozy, “I belong here” feeling.
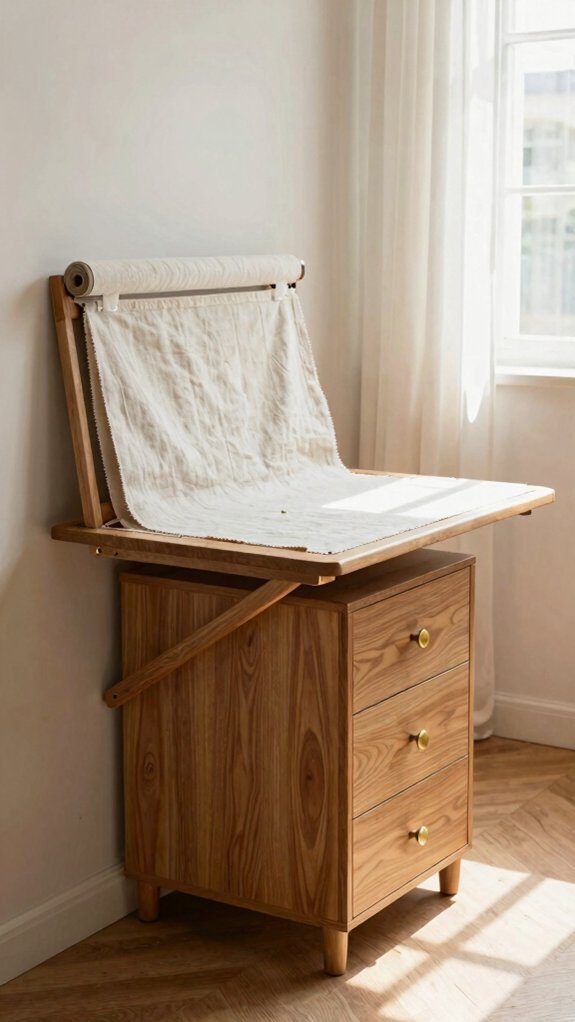
Convertible desks
If your sewing stash has outgrown the ottoman trick, a convertible desk can be the next tiny-space win, and wow, it packs a punch!
I love a wall-mounted fold-down desk with built-in storage, because it gives me a 24–36 in surface, then folds flat when I’m done.
- Add cubbies or a pegboard for scissors and rulers.
- Choose casters, and I can roll my sewing station away fast.
- Pick a sturdy top for cutting, plus drawers for mobile ironing and incorporated lighting.
That’s how I keep my space calm, cute, and ready for guests!
Vertical Storage That Clears the Floor

I love using vertical storage to get stuff off the floor, and I’d start with pegboards and wall grids because they keep scissors, rulers, and other grab-and-go tools right where I can see them—no more “where did that thing go?” panic.
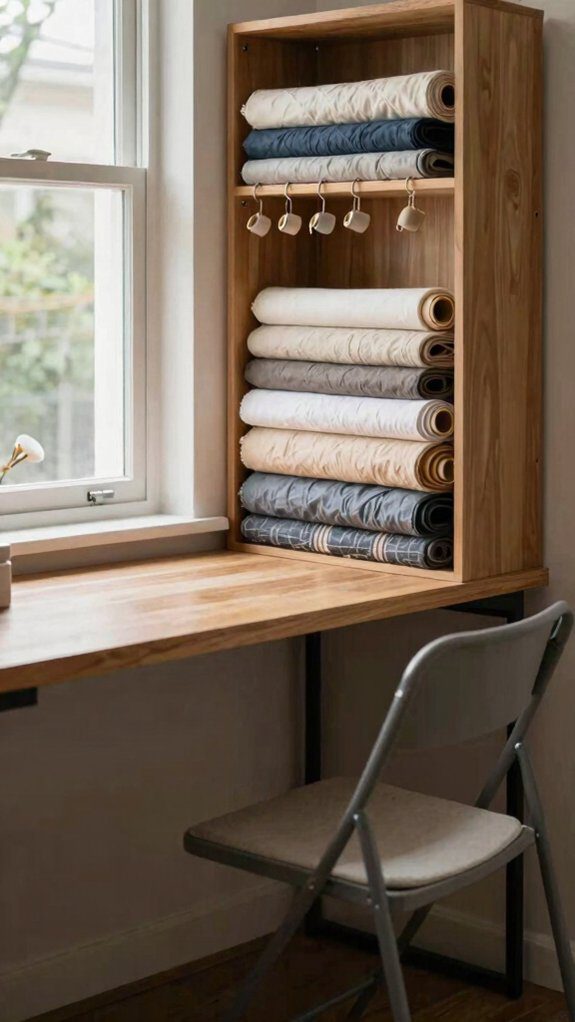
Floating shelves are another easy win, since a few sturdy boards, simple brackets, and labeled bins can hold thread, fabric, and small notions without eating up precious floor space.
For the real space-saver, I hang organizers on the wall for bigger items, and suddenly my sewing corner feels bigger, tidier, and a lot less like a fabric explosion!
Pegboards and wall grids
A pegboard or metal wall grid can really clear the decks in a tiny sewing space, and I love how it turns plain wall space into a super handy tool zone! I mount mine at eye level, so scissors, rulers, and cutters stay close, not buried in drawers.
- Add S-hooks and clear bins for thread, pins, and snaps.
- Try a magnetic toolboard for tiny metal notions, it’s a little treasure wall!
- Make a pattern clipping station with clips, labels, and a fold-down tray.
If you rent, use a tension grid. I’ve found it cuts clutter fast and makes me feel right at home.
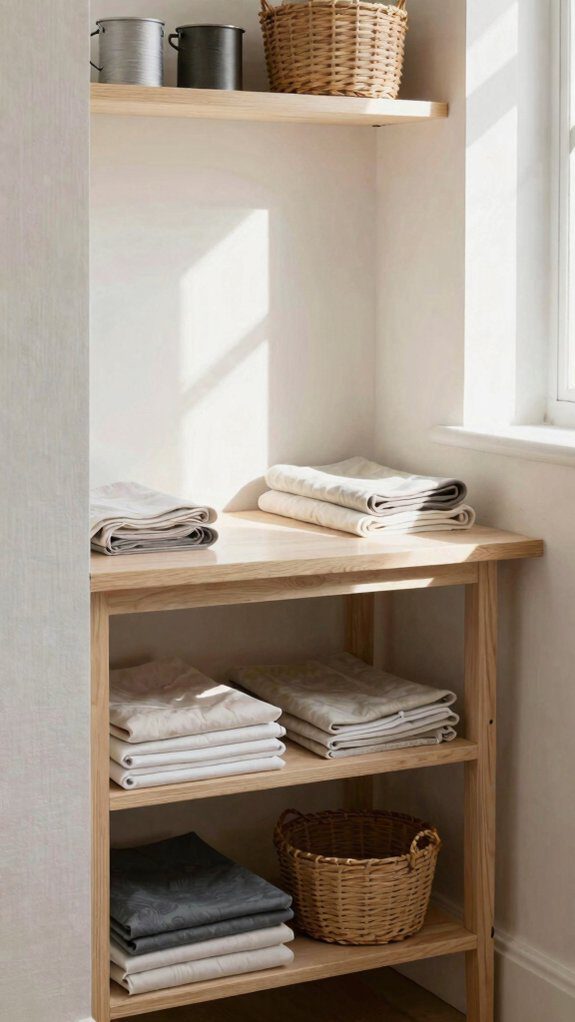
Floating shelves
Wall space can do so much more than hold a pegboard, and floating shelves are my favorite way to send clutter upward without making a tiny sewing room feel packed to the gills!
I hang them 30–40 cm apart, then use clear labeled bins for scraps, WIPs, and trims, so I can grab what I need fast. Pick 20–30 cm depths, plus sturdy anchors, and the shelves stay safe for fabric bolts and books.
Near my sewing table, eye-level shelves keep tools close, and decorative brackets add charm.
My favorite trick? A narrow shelf with a slim peg rail underneath—wow!
Hanging organizers
Tuck those tools up and out of the way, because hanging organizers can rescue a tiny sewing space in a big hurry! I use door caddies, window pockets, and other vertical helpers to keep my gear visible, tidy, and off the floor.
- Clear zip-front organizers: hang one on a door, load scissors, rulers, and notions.
- Pegboard or slatwall: add hooks and bins above my table for thread and clips.
- Tension-rod baskets: slip them in a closet for mats and boards.
I love that I can find everything fast, and my room still feels roomy.
Hidden Sewing Spaces That Disappear
I love a sewing spot that can vanish in a flash, and cabinet setups are a smart place to start, since a fold-down table or closet nook can hide your machine, tools, and fabric behind clean doors.
Under-bed storage is another sneaky win, because labeled bins on casters can slide out for easy access, then tuck away when you want the room back.
And behind-door solutions? That’s where the fun really kicks in, with slim shelves, a pegboard, or a curtain keeping supplies close but out of sight—pretty neat, right?
Cabinet setups
When space is tight, cabinet setups can feel like a tiny magic trick, because your sewing room appears only when you need it and disappears when you don’t! I love how incorporated cabinetry and concealed outlets keep things neat, safe, and ready for me.
- A wall fold-down table, with modular storage, opens fast and folds flat.
- A closet nook with a desk-height top and caster cabinets rolls thread and mats away.
- A flip-top cabinet hides my machine, cuts glare, and keeps clutter low.
For renters, I’d choose a shallow console-style cabinet, so my setup feels like home, not chaos!
Under-bed storage
Cabinets are great, but the space under your bed can be a sneaky little sewing hideout too!
I use low bins for cutting mats, rulers, and flat pre-cuts, and my floor clears fast—hello, tiny room magic!
For seasonal rotation, I stash washed fabric in breathable covers, or vacuum packed bags for off-season cloth.
I keep rolled bolts on cardboard tubes in wide drawers, and one labeled WIP bin means I can jump back in quickly.
Add under bed lighting, clear lids, and a taped inventory list, and even my mobile cutting table feels like part of the club.
Behind-door solutions
Swing open that door, and you’ve got a whole sneaky sewing zone hiding in plain sight! I love how a behind-door setup makes me feel like I’ve joined the cool club of tidy makers.
- I mount a fold-down table with piano hinges, then add magnetic strips for scissors and pins. Cheap, easy, and it disappears fast.
- I use a door hammock or slim pegboard for rulers, cutters, and tiny bins, so tools stay handy, not messy.
- I tuck in a rolling cart and vertical fabric bins; add a little ironing shelf, and boom—my whole sewing nook vanishes when I’m done!
Lighting Tricks to Open Up the Space
I love starting with bright task lighting, because a good overhead LED and a small adjustable lamp can make my sewing table feel bigger and way easier to use, even if the room is tiny!
Next, I like to sneak in mirror placement ideas and light color schemes, since a mirror can bounce light around like magic, and soft white walls or a light floor help the whole space feel open and cheerful.
And here’s the fun part: when I face my workstation toward a window, use a sheer blind, and keep shadows down, the room suddenly feels less like a closet and more like a happy little studio.
Bright task lighting
Bright task lighting can make a tiny sewing corner feel twice as big, and honestly, that’s one of my favorite little tricks!
I aim for daylight balance overhead, then I add focused lamps for task ergonomics, so my eyes don’t work overtime.
- Set a 4000–5000 K LED overhead and a 300–500 lux lamp at the machine. Cheap, easy, and it cuts strain fast.
- Place your table near a window, then use a sheer blind to soften glare. Nice, natural, and still bright!
- Slip LED strips under shelves, then clip on a high-CRI lamp for tiny hems. That’s the secret sauce!
Mirror placement ideas
A well-placed mirror can make your sewing nook feel like it borrowed a little extra sunshine, and that’s such a fun trick!
I like mirror placement opposite a window, so daylight bounces around and the room feels bigger fast. A large framed mirror with slim edges works well, and it’s easy to hang at eye level.
For a narrow wall or door, I’d try a full-length mirror, because it adds depth without crowding your table.
Want a little sparkle? Reflective accents like small mirrors or mirrored tiles can scatter lamp light, soften shadows, and add texture. Cute, simple, and budget-friendly!
Light color schemes
How do you make a tiny sewing nook feel less like a closet and more like a cheerful little studio? I start with light color schemes, because they bounce daylight around and instantly lift the mood!
- Paint walls and ceiling in warm whites or muted creams; cheap, easy, and the room looks bigger fast.
- Add a satin countertop or light wood floor, plus a mirror, to catch every bit of brightness.
- Use a sheer blind and soft LED task light near the machine, so you get glow without glare.
It’s cozy, bright, and very you!
Who This Works Best For
If you’re short on space but still want a real sewing setup, I think this style works best for apartment dwellers, renters, busy parents, and anyone sharing a home with other people.
I see it fitting urban commuters and solo crafters too, because a 4–6 square meter nook feels tidy, not crowded.
I’d start with a bright window, a slim table, and an adjustable LED lamp, then add vertical shelves, clear bins, or a rolling cart. Easy!
Repurposed furniture and thrifted finds keep costs low, while fold-down pieces and casters let the room switch back fast. That’s a win for everyone!
Frequently Asked Questions

When I set up a sewing nook in a small space, the first questions people ask are usually the practical ones: “How tiny can it really be?” “Do I need stylish furniture?” and “Will it turn into a fabric explosion?”
The good news is that a functional sewing area can be surprisingly small, and I’d aim for about 4–6 square meters, with a workspace depth of 90–100 cm so cutting and machine work don’t feel cramped.
- Use fold-down tables for quick cuts.
- Stack bins high for fabric sourcing and notions.
- Add bright light for small ergonomics, so seams feel easy.