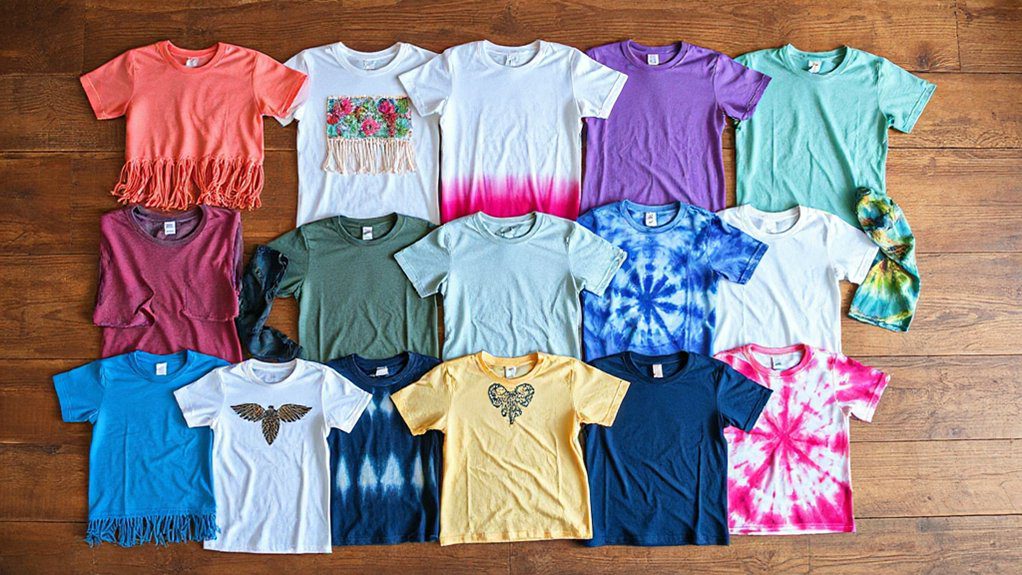

15 Cut Up T Shirt Ideas That Look Trendy & New
I love turning a plain tee into something fresh with just scissors, chalk, and a ruler! Try a crop, knot hem, asymmetrical hem, deep scoop neck, deep V, distressed holes, open back, lace-up sides, or grommet details; just mark inside out, cut slowly, and tug edges so they roll. Each one looks trendy, costs almost nothing, and works for beginners. Stick around, because the surprise cut-up trick is coming up next for your tee game.
Love cozy DIY projects? 💕
Get free printable guides, exclusive tutorials & surprise craft goodies straight to your inbox.
Disclosure: This post may contain Amazon affiliate links, at no extra cost to you. Content on DiyCraftNest is created with research support from AI tools and carefully reviewed, edited, and fact-checked by the lead author, Daniel Pat, to ensure accuracy and reliability. Learn more
Key Takeaways
- Deepen necklines with scoop, V-neck, one-shoulder, or off-the-shoulder cuts for a modern, flattering shape.
- Crop shirts with straight, asymmetrical, or slit hems to create balanced proportions and added movement.
- Add side slits, knot hems, or lace-up details for a streetwear-inspired look that feels custom-made.
- Transform backs with open-back, cross-slit, or bra-friendly cutouts for a bold, breathable finish.
- Refresh sleeves and armholes with sleeveless, cap-sleeve, or distressed-edge cuts for a cleaner, trendier tee.
Cut Up T-Shirt Crop
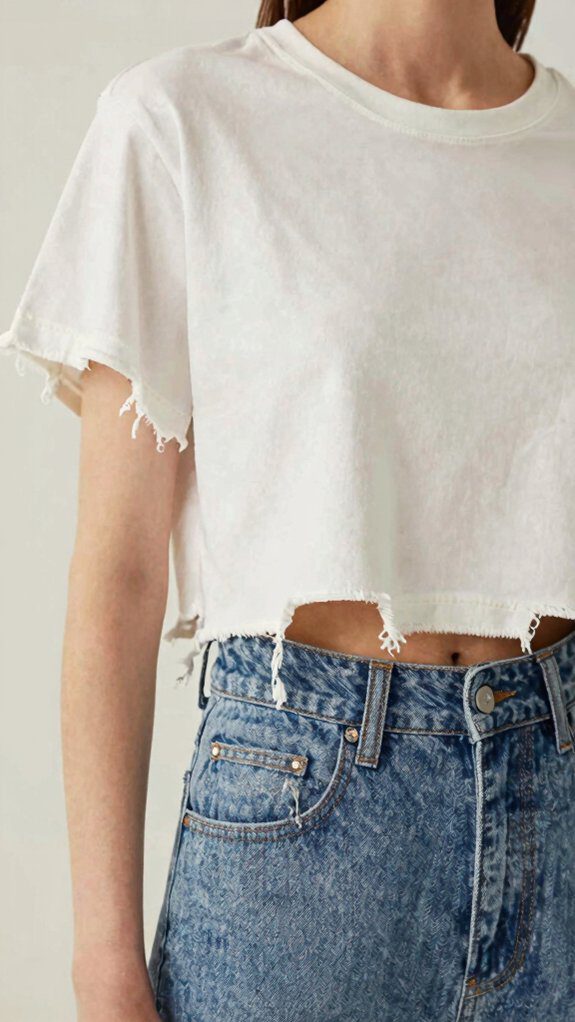
When I want an easy closet glow-up, I grab a T-shirt, a ruler, and sharp fabric scissors, then I measure the crop while I’m wearing it so I don’t accidentally create a “whoops, that’s a tank top now” situation!
I mark it 1–3 inches below the graphic or at my natural waist, then lay it flat and connect the dots with the ruler. One smooth cut keeps the edge neat, and a little tug makes it roll up.
If you want a fresh, friendly look, I love it under layered crops, and elastic bands at the waist help the style feel finished, fun, and totally doable.
Cut Up T-Shirt Knot Hem
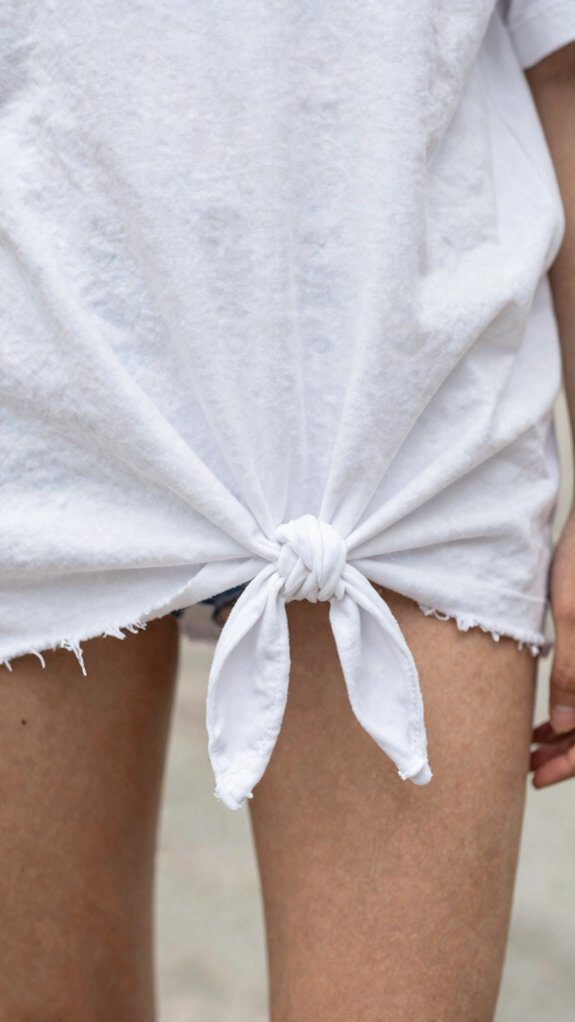
I love a knot hem because you only need an old tee, sharp fabric shears, and a couple of minutes, and the double-tail knot keeps things neat instead of giving you that lumpy single-bump look!
I cut a centered slit, split the flap into two tails, and tie them together, and you’ll see the hem lay flatter and feel easier to wear, even if you’re brand new to DIY.
If you want a little extra flair, I’ll show you the side-knot version next, which is a fun twist that looks cooler than it sounds, promise!
Double-Tail Knot
Grab a tee, fabric scissors, and a minute or two, because the double-tail knot hem is one of my favorite easy cut-up moves for turning a plain shirt into something cute and cropped!
I grab scissors and a cotton tee, then cut a 3–4 inch slit at the center front hem and split it into two narrow tails. I tie a double knot for a flatter finish, and for fabric longevity, I untie it before washing. Stretch the edges, and the hem rolls nicely. My styling tips: make one tail longer for a smoother drape. Cute, quick, and budget-friendly!
Side Knot Variation
Twist your tee into a side-knot hem, and I love how fast this little upgrade comes together with just a shirt, sharp fabric scissors, and a couple of minutes!
I mark the crop point while wearing it, then make a 2–3 inch slit at the hem and cut two 3–4 inch tails.
For side knot placement, I just mirror lengths, stretch edges, and handle knot tail shaping so they roll under and fray less.
Two tails and a double-loop knot help you fit in—way less bump! It’ll work best on shirts 1–3 sizes up, with a shallow crop.
Asymmetrical T-Shirt Hem
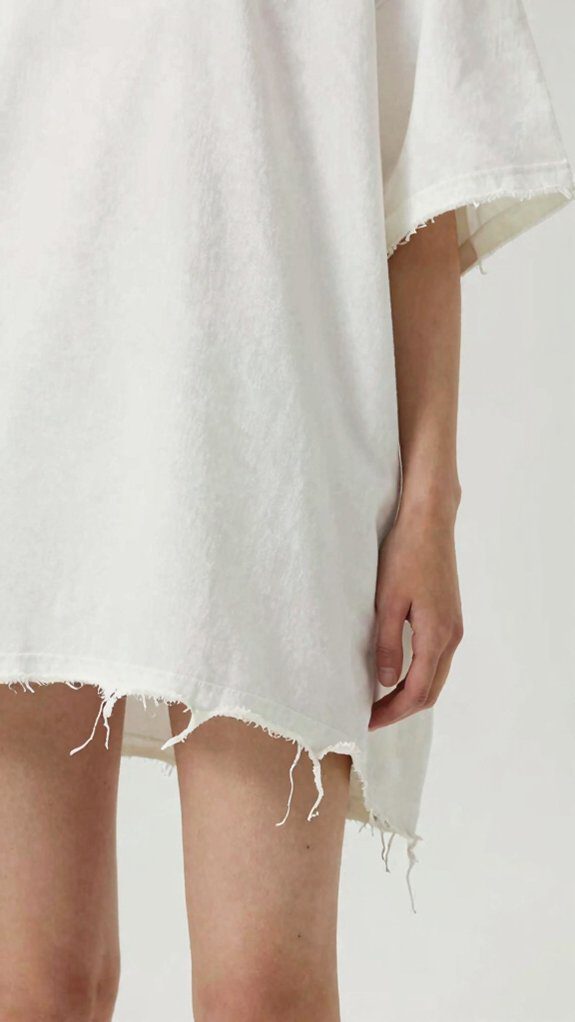
When I want a tee to look instantly cooler, I start with a simple asymmetrical hem—just a shirt, sharp fabric shears, and a marker or pins, nothing elaborate! I mark one side 3–6 inches shorter, then cut a smooth diagonal.
I know you get that polished, custom look, and it’s like our tee is in on the joke!
- Start with 1–2 inches if you want subtle angled asymmetry.
- Tug cotton’s raw edge, and it rolls to hide fuzz.
- That trick gives asymmetric draping and a clean finish.
- Add a center-front slit for extra swing, and test it carefully first.
Cut Up T-Shirt Deep Scoop Neck
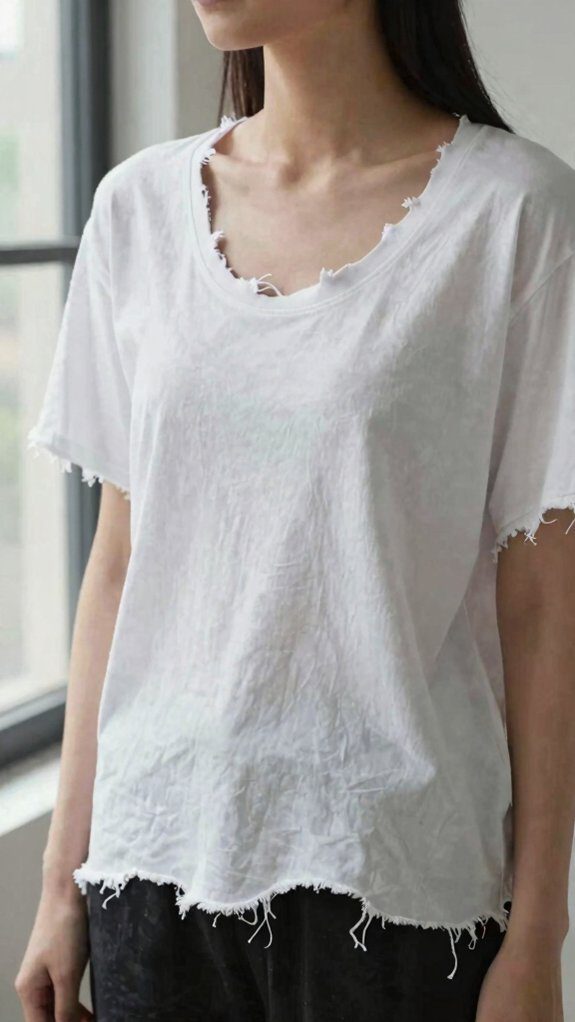
A deep scoop neck can make a plain tee feel instantly flirty and fresh, and I like starting with the shirt inside out, a marker, and sharp fabric shears—nothing elaborate, just a cheap little makeover!
I cut a curve from shoulder seam to shoulder seam, starting two inches lower, then I’ll try it on and drop the scoop in half inch steps until the coverage feels right.
If you’d like a cleaner finish, I pull off the ribbed band, reuse it as neckline reinforcement or off shoulder straps, and let thicker knits curl after a stretch and wash.
Cut Up T-Shirt Deep V-Neck
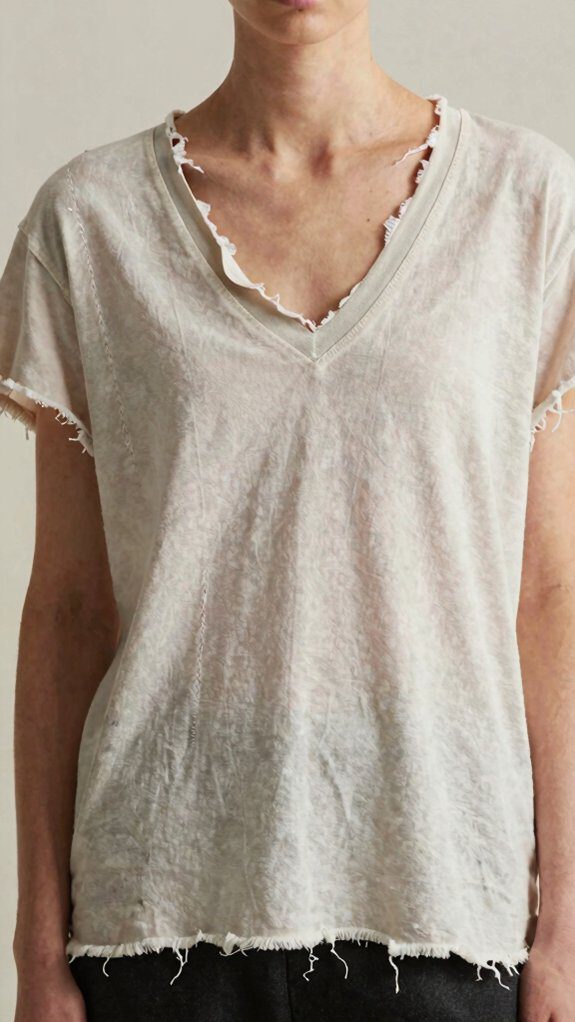
I grab a plain tee, a little chalk, and scissors, then I mark the center of the collar so I can sketch a deep V that looks bold, not crooked—easy and cheap, yay!
From there, I cut from the middle first and keep both sides even, snipping a little at a time so you can check the fit before you go full rock-star.
When the V looks right, I gently stretch the fabric and let the edges roll a bit, which gives that relaxed shape and saves you from a stiff, boxy finish.
Mark The V
Grab your sharp fabric scissors and let’s sketch that deep V! I turn the shirt inside out, mark the collar center, and check collar alignment, fabric stabilization, so the knit sits in place.
- Use a washable marker and ruler.
- Make a short horizontal slit one to two inches below the ribbing.
- Trim diagonally to a point, slow and steady.
- Stop, try it on, and smile when the V opens up!
I keep it small because jersey relaxes and the vibe gets bold. No ornate tools, just patience, and we’ll all look smoothly cool for every newly nervous DIY friend.
Cut Symmetry First
With the V marked, I keep this part super neat by turning the shirt inside out and measuring equal spots from the collar center with a ruler or tape measure, so the cut lands right in the middle instead of wandering off like it got lost on the way.
That center positioning keeps the V balanced, and I make a short horizontal slit first, then angle both sides down with mirror cutting to form a clean triangle.
I stop a little above the bust, try it on, and, wow, the result looks custom without costing much at all, honestly.
Stretch For Shape
Stretching the fresh cut is the fun part, because this is where a plain deep V starts looking intentional instead of a little too sharp.
I don’t use tools; I coax the edge outward so the fabric memory eases up and the hem rolls.
- Budget scissors, centered mark
- Tug the V gently
- Stop before the bust
- Save ribbing for trim
That small pull gives relaxed recovery, a softer line, and a friendlier fit.
If you want extra polish, reapply the ribbing, and boom—your tee feels custom, not awkward, and it still feels easy, cool, and yours every time!
Cap Sleeve T-Shirt Cut
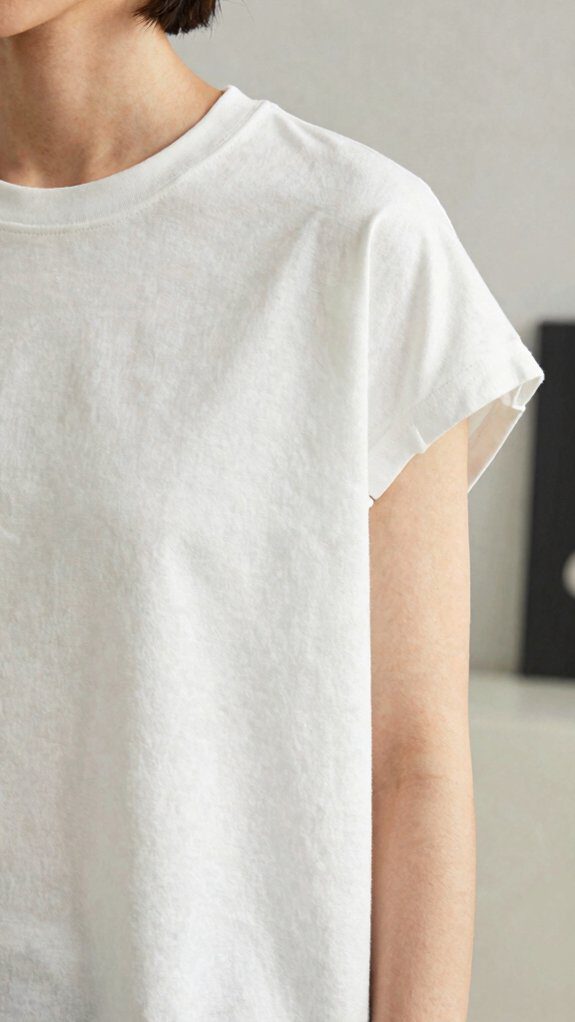
Turn a plain tee into a cute cap sleeve in minutes, and it barely costs anything if you’ve already got a shirt, sharp fabric shears, and a marker!
I lay it flat, do fabric stretch testing, then mark a curved line from the shoulder seam to just above the armpit for cap sleeve tailoring.
I cut both layers at once, trimming one to two inches and angling toward the shoulder for movement.
After each tiny trim, I try it on, stop before the seam, and tug the edge so it rolls under.
Tiny snips add lived-in flair, hey, too!
Sleeveless T-Shirt Cut

I’ll turn a plain tee into a sleeveless favorite, and it’s easier than it sounds—just grab fabric shears, lay the shirt flat, and cut the sleeves off cleanly along the shoulder seam.
Next, I’d mark both armholes, snip a little at a time, and check the fit as I go, because that keeps the shape neat and helps the shirt stay comfy without any awkward gaping!
For a cool worn-in vibe, I stretch the raw edges with my fingers so they curl and fray a bit, which gives the tee that casual, just-right finish.
Remove Sleeves Cleanly
Grab a pair of sharp fabric shears, and I like to lay the tee flat inside-out, line up the shoulder seams, and snip along the shirt’s original shoulder seam from neckline to armhole so the sleeve comes off cleanly without turning the armhole into a giant gap—nice and neat!
- Sharp shears.
- Tiny snips.
- Try on often.
- For flat hems, add armhole reinforcement with ribbing if you want extra polish.
You’ll get a cool, worn-in look, and your tee will feel made-for-you, not store-bought, which honestly feels pretty great today too.
Shape The Armholes
Usually, I lay the tee flat, smooth out the shoulders, and mark matching cut lines with a measuring tape before I even touch the scissors, because a sleeveless shirt can go from cool to “whoa, that’s a lot of side” fast!
I keep the cut 1–2 inches from the shoulder seam for modest coverage, then trim a shallow curve toward the underarm if I want a snug fit.
After that, I tug the raw edge inward and let the knit roll, or use armhole reinforcement with edge binding from the cut-off sleeve for clean, store-bought finish for real today!
Distress The Edges
Lay the tee flat, mark the shoulder seams, and cut the sleeve off in one smooth sweep from collar to armpit with sharp fabric scissors—you’ll keep the armhole shape neat, and this whole project costs practically nothing!
If your tee is oversized, start 1–3 sizes up so fit stays relaxed, not gappy, and feels like yours.
I keep it simple:
- Snip 1–2-inch marks around the raw armhole.
- Gently pull each cut open for layered distress.
- Try it on after every round; cotton curls fast.
- Wash once, and the frayed neckline vibe gets softer and cooler.
Cut Up T-Shirt One-Shoulder

If you want a quick DIY that looks way more polished than it sounds, I’d turn a plain tee into a one-shoulder top with just scissors, a mirror, and a little patience!
I flip the shirt inside out, line up the seams, then cut a diagonal from one shoulder toward the collar. I start small, try it on, and widen only if needed—trust me, less panic, more win!
The asymmetrical strapline feels cool, and a layered mesh overlay or ribbing strip can stabilize it. Flip it right-side out, stretch the edge, and boom, you’re in the club now too.
Cut Up T-Shirt Off-the-Shoulder

I start by turning the tee inside out and marking a shallow cut line across the collar with chalk, so you can keep things neat and avoid a “oops, that’s too much” moment!
Then I slice it off carefully—staying a little conservative at first, because you can always trim more—and if you want a balanced look, I’ll even make the front and back match so it sits nicely on both shoulders.
After that, I tug the raw edge a few times and let it drape, which gives the shirt that easy, lived-in off-the-shoulder vibe without much effort at all.
Mark The Cut Line
Grab a fabric marker and measuring tape, then turn your tee inside out with the front facing up so you can map out the new neckline without guesswork. I mark the center, then use my tape to keep shoulders even, about 4 to 6 inches out, depending on fit. That tiny check saves you from a lopsided “oops” later!
- Find collar positioning fast.
- Follow the fabric grain for a clean line.
- Mark 1 to 2 inches down for subtle.
- Go 3 to 4 inches for bolder.
When I’m done, the tee feels like it belongs in my closet crew.
Slice Off Shoulder
Now that the neckline’s marked, I’m turning this tee into an easy off-the-shoulder look with just fabric shears and a fabric marker! I keep it cheap and easy, and this trick works on tees that need a sweeter boho neckline without weird gaps.
| Move | Result |
|---|---|
| Inside out | cleaner cuts |
| Mark midpoint | centered opening |
| Snip small | less regret |
| Widen slowly | bra-friendly fit |
| Curl edge | soft finish |
On oversized tees, I remove the neck ribbing first, then widen the scoop little by little, matching shoulder seams each time, so the elasticized band feels comfy, bra-friendly, and looks like ours all day.
Stretch For Draped Look
If you want that effortless, draped off-the-shoulder vibe, I’m starting with a tee that’s at least one size bigger, a fabric marker, and sharp shears, because this look needs a little room to relax instead of clinging like a needy octopus!
I snip a shallow slit 1–2 inches below the collarbone, then stretch the knit until it curls under and slips off one shoulder.
- Cut inside out for a softer scoop.
- Try a diagonal snip for one-shoulder drama.
- Use a bigger tee for better fabric recovery.
- Add elastic inserts if you want a neater edge.
Trust me, it works.
Cut Up T-Shirt Cold-Shoulder Cut

Once I turn a tee inside out, I can make a cold-shoulder cut with just chalk, scissors, and a few minutes of courage!
Then I mark the mid-shoulder, snip a small diagonal wedge from seam to sleeve hem, and I keep the first cut modest, about 30–40% of the sleeve width. I mirror both sides, tug the raw edges so they curl, and if the opening feels too wide, I trim less or knot a strip for adjustable coverage.
I love adding shoulder embellishments or strap variations, too, and a cropped hem keeps the whole look fresh and mine.
Cut Up T-Shirt Side Slits
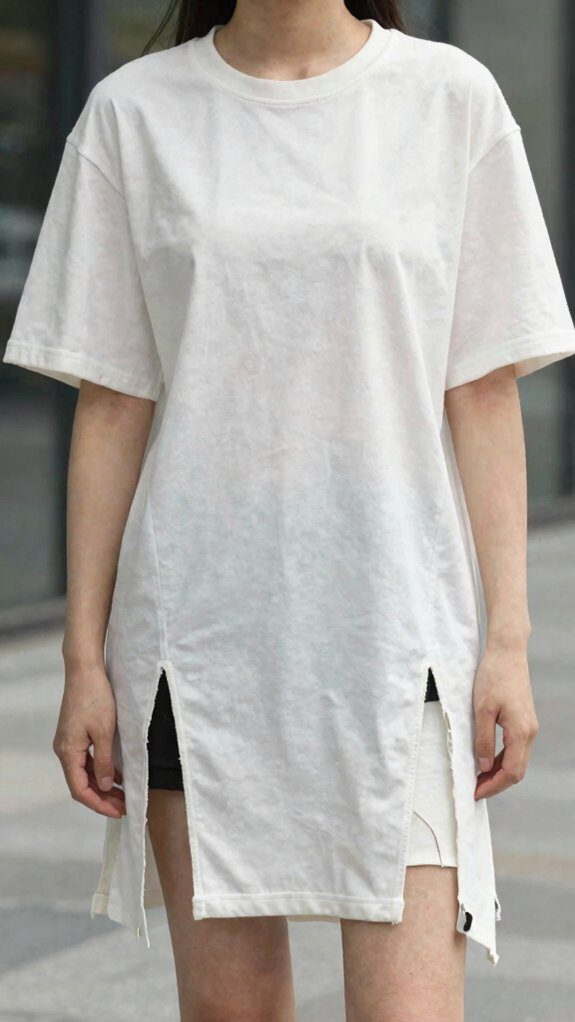
Usually, I grab a tee, a scrap of chalk, and scissors when I want to add side slits, because this upgrade is cheap, beginner-friendly, and weirdly satisfying!
To keep side slit styling clean, I fold the tee in half, match seams, and mark slit placement with chalk. A forward angle keeps the hem from gaping.
- three to four inches
- five to six inches
- angle forward
- try on first, finish with raw edges or a few stitches
That tweak gives movement, keeps the fit relaxed, and makes your tee feel like it belongs with the crew, low cost, and polished.
Cut Up T-Shirt Distressed Holes
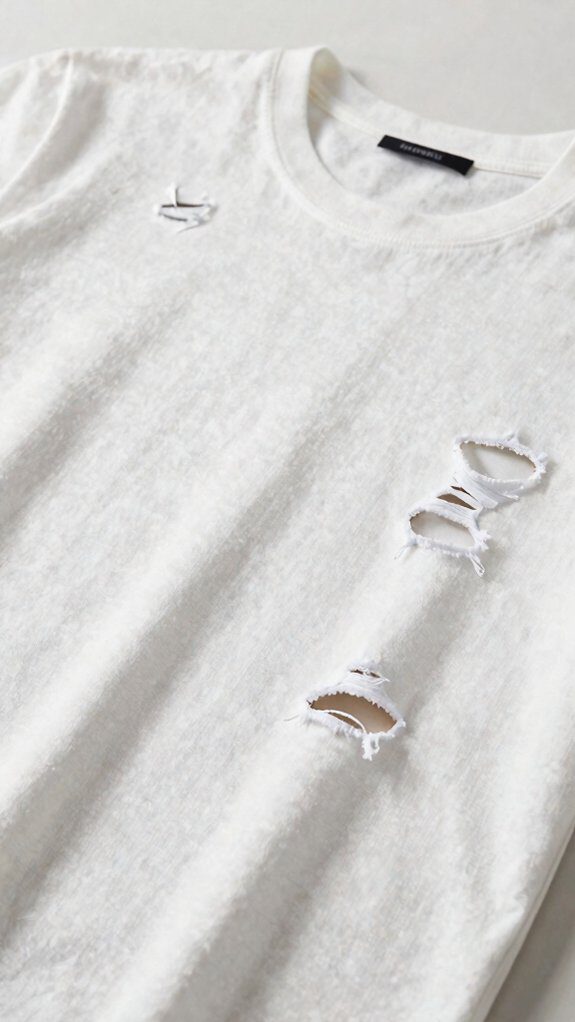
I love turning a plain tee into something a little more edgy with distressed holes, because it costs almost nothing and takes just sharp fabric scissors and a little patience!
I space them unevenly, clustering tiny cuts near the collarbone and bigger ones lower down, so hole placement feels natural.
| Step | What I do | Result |
|---|---|---|
| mark | small, uneven cuts | vintage vibe |
| snip | front layer only | less stretch |
| rub | gentle pull | fabric fraying |
| wash | tumble low | soft edges |
After a wash and gentle pull, the edges curl up, and you’ll feel like it came from the coolest thrift-store crew ever!
Open-Back T-Shirt Cut
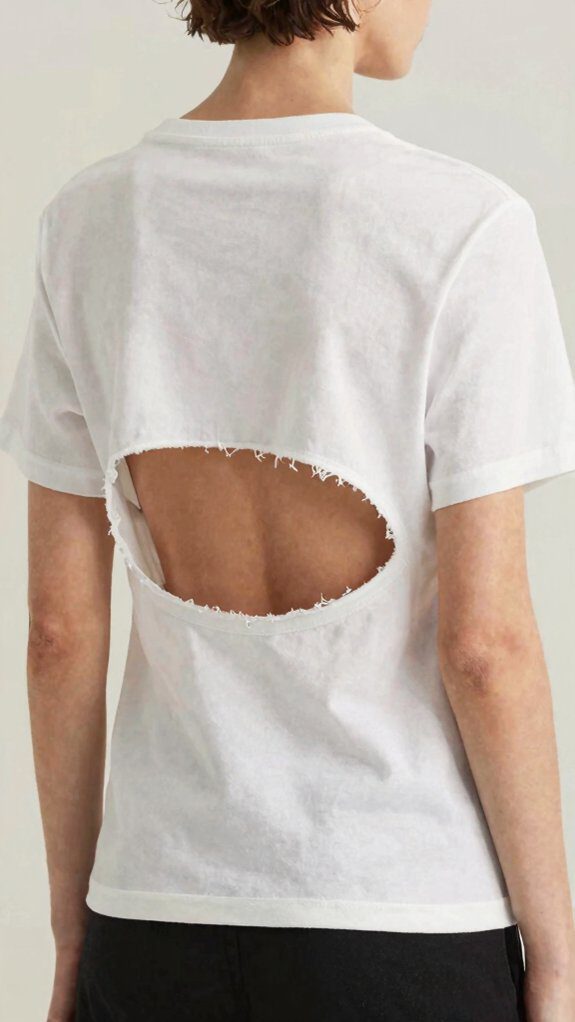
Flip that tee inside out and get ready for a quick little glow-up!
I mark a center line, cut 6–10 inches down, then stop 1–2 inches from the hem so it lays flat.
- Use scissors and chalk.
- Stretch edges for a rolled finish.
- Add tiny bottom notches for comfort.
- Try a wider cut for bra friendly backs or layered backpanels.
If I want drama, I snip a few cross slits and thread strips through them.
It’s cheap, easy, and gives my crew a cool, breathable look!
Every wash softens the raw edge, and the vibe stays laid-back all day.
T-Shirt Lace-Up Side Seams

After that open-back tweak, I like to mess with the side seams next, because a few careful snips can turn a plain tee into a lace-up little showpiece!
I cut matching six to ten inch slits on both sides, then stitch the edges so they don’t stretch. Next, I weave ribbon, a shoelace, or 1/4-inch cord in a crisscross pattern, and I leave a little tail for tying.
For extra personality, I use contrasting lace, layered underlays, or elastic inserts, then tug and wash for soft, rolled edges and a fit that feels custom for anyone wanting to belong.
T-Shirt Grommet-Lacing Details
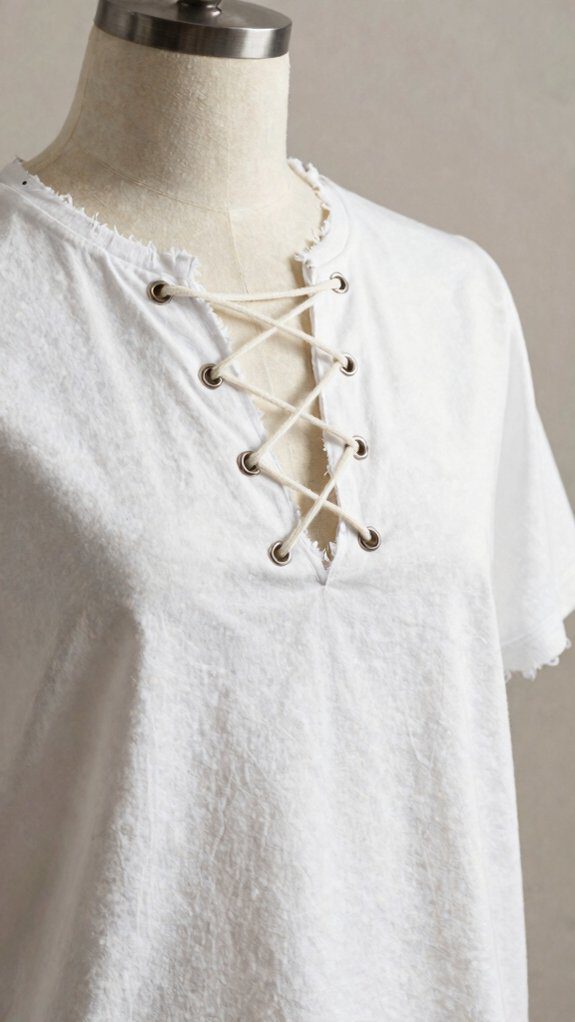
For a cleaner, tougher lace-up look, I swap in grommets along an open side seam or a diagonal cut, because tiny metal eyelets keep the knit from stretching out and give the shirt that cool, finished edge!
Best part, it’s cheap and easy, really!
- I mark flat fabric, keep grommet spacing at one to two inches, and punch clean holes.
- I back worn tees with scrap knit, so the eyelets stay sturdy.
- I lace with shoelaces, ribbon, or elastic lacing for an easy cinch.
- I crisscross, tug once, then wash gently; the edges curl, and the vibe looks pro!
Frequently Asked Questions
What T-Shirt Fabrics Work Best for Cutting and Shaping?
I’d choose cotton blends first, because they cut cleanly and hold shape, while slinky knits drape softly for edgy cuts. You’ll feel right at home experimenting when the fabric cooperates with you best, too, honestly.
How Do I Mark Cuts Evenly Before Starting?
Measure twice, and I mark matching chalk lines from seam to seam so every cut feels intentional. I fold the shirt, center my guide, and you’ll feel like you belong in the look today too.
Which Tools Make Clean, Precise T-Shirt Cuts?
Precision shears and a rotary cutter give me the cleanest, most precise t-shirt cuts, and I know they’ll help you feel confident too. I’d pair them with a ruler and mat for the neatest results.
How Can I Stop Cut Edges From Unraveling?
Like stitching a safety net, I seal your cut edges with clear fabric glue or a narrow hem for fray prevention, and I know you’ll feel right in the style circle with edge sealing too.
What’s the Best Way to Style Cut-Up Tees for Layering?
I’d pair your cut-up tee over a fitted tank or under an oversized jacket, so you get layered proportions and neckline variation that feel intentional. You’ll fit right in while still looking uniquely yours everywhere.