
Denim Bag Ideas From Old Jeans That Look Stylish and Sellable
I turn old jeans into stylish bags that look shop-ready, and they’re cheap, easy, and honestly kind of fun! Start with a tote, crossbody, or shoulder bag using the waistband, pockets, and sturdy seams, then try a belt bag, travel organizer, or drawstring pack for extra function. Add patchwork, quilting, or a flap for a more decorative finish, and you’ll get a real sellable look without fancy tools. Stick around, and I’ll show you the smartest ideas next!
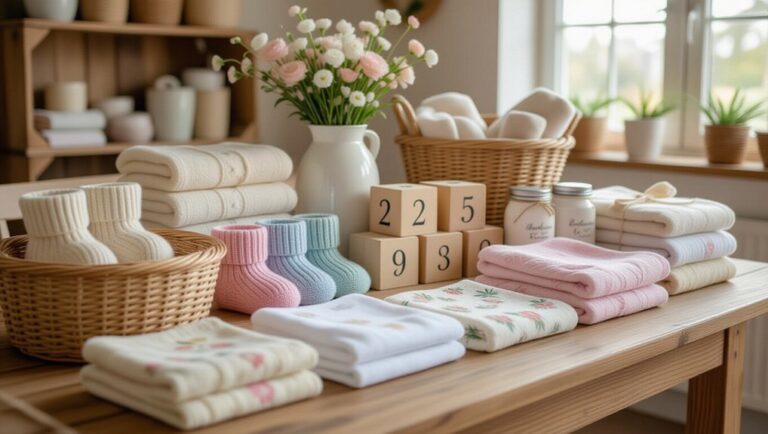
Love cozy DIY projects? 💕
Get free printable guides, exclusive tutorials & surprise craft goodies straight to your inbox.
Disclosure: This post may contain Amazon affiliate links, at no extra cost to you. Content on DiyCraftNest is created with research support from AI tools and carefully reviewed, edited, and fact-checked by the lead author, Daniel Pat, to ensure accuracy and reliability. Learn more
Key Takeaways
- Keep visible denim details like pockets, waistband, and belt loops to make bags look authentic and premium.
- Use sturdy seams, zigzag finishing, and topstitching so the bag holds shape and feels well-made.
- Favor clean silhouettes like totes, bucket bags, and crossbody styles for broad sellability.
- Add practical features such as compartments, organizers, and reinforced bases to increase everyday usefulness.
- Mix denim with contrast fabrics, quilting, or patchwork for a more stylish, handcrafted look.
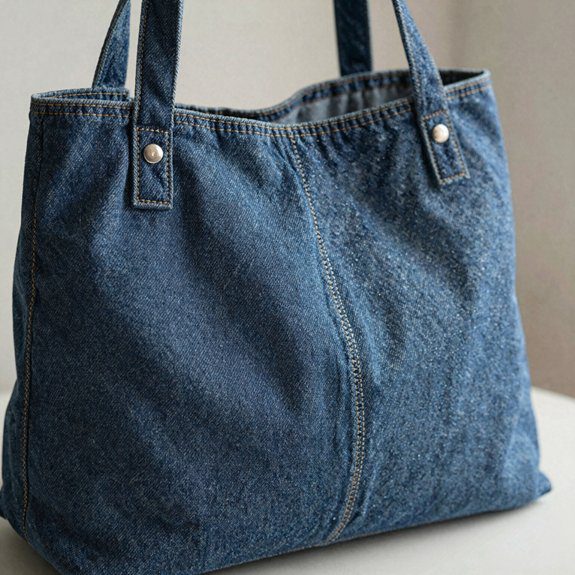
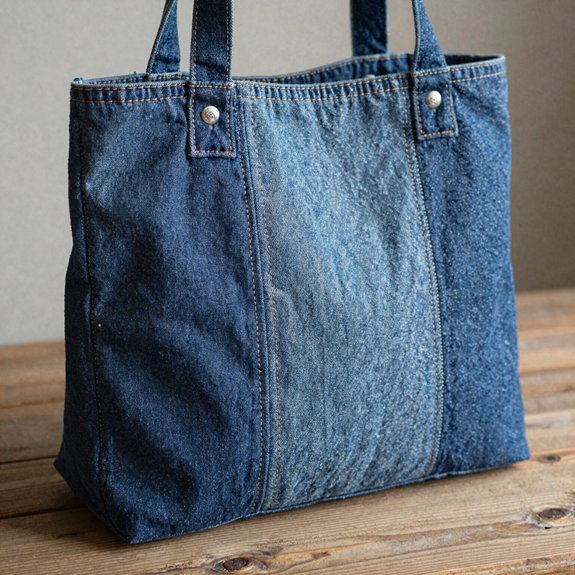
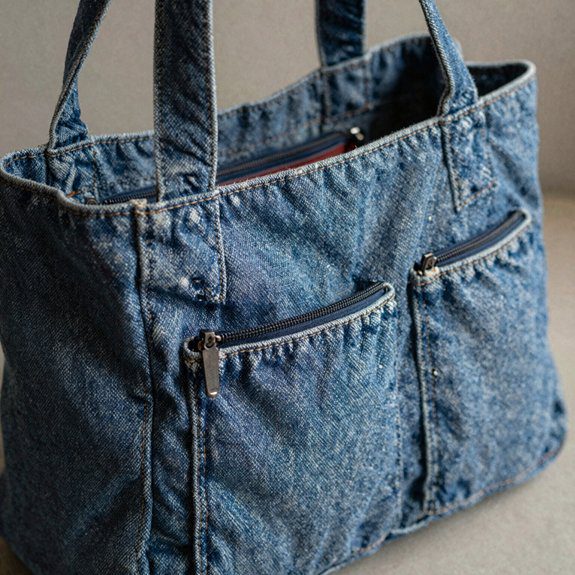
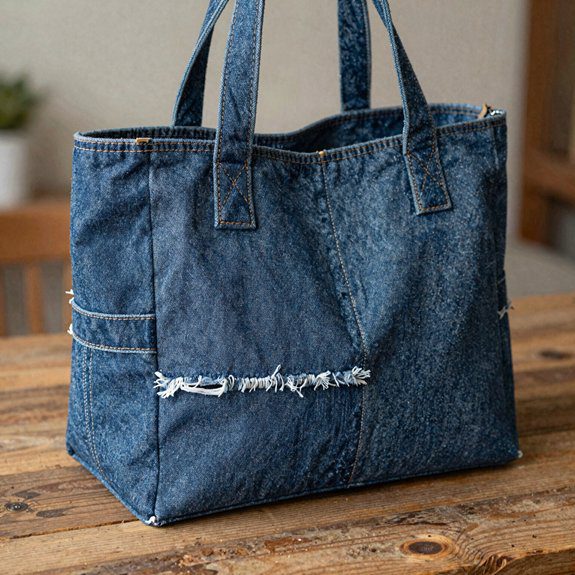
Classic Denim Tote Bag with Pocket Detail
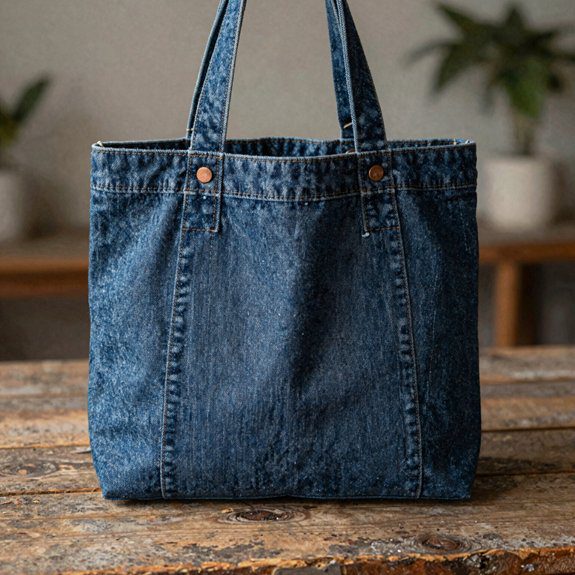
If you’ve got an old pair of jeans and a little spare time, I think this classic denim tote bag is one of the easiest wins ever! I cut both pant legs to the same height, then stitch the front and back panels together with a strong bottom seam, and wow, it already looks shop-worthy.
I keep the front pocket or fly pocket intact for that cool, familiar detail, then topstitch it on with matching thread.
Next, I tear out the inner crotch seam, flatten the panels, and finish the edges with zigzag stitches.
For Denim strap upgrades, I turn the waistband into sturdy handles and bar-tack every attachment point.
These sell ready stitching tricks make the bag tough, neat, and ready to carry anywhere!
Crossbody Bag Using Jeans Waistband

Since the waistband already has belt loops and a tough shape, I love turning it into the top frame of a crossbody bag—so smart, and honestly, it looks way fancier than the effort it takes! I start with sturdy jeans, trim the legs to size, then flatten the panels by removing the inner crotch seam and curves.
| Step | What I Use | How It Feels |
|---|---|---|
| Cut | Jeans legs | Exciting |
| Sew | Waistband frame | Secure |
| Finish | Webbing strap | Ready to wear |
I stitch the panels to the waistband, add reinforced seams, then attach a webbing strap near the waistband seams with bar-tacks. For the bottom, I make a clean base and keep the fly neat, so the bag looks polished. It’s cheap, beginner-friendly, and yes, totally friend-group worthy!
Small Denim Shoulder Bag with Flap
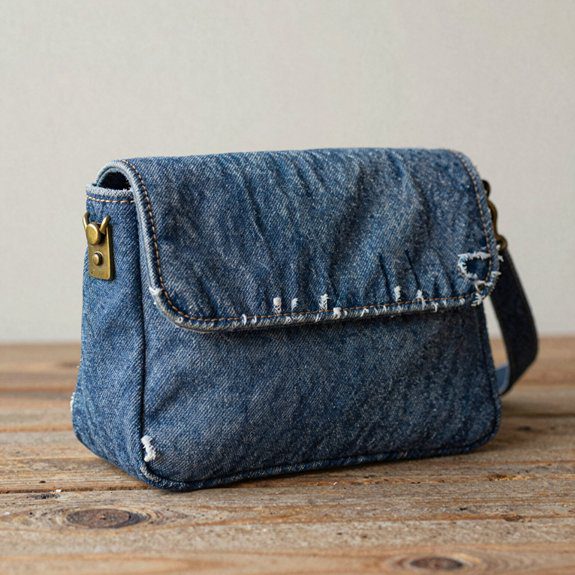
A small denim shoulder bag with a flap is one of those projects that feels extra cute right away, and it still starts with the same old jeans magic—just cut off both legs, keep the waistband area in mind, and trim the body to a compact size, around 26–30 cm tall, so it stays neat and easy to wear.
I love this one because it looks pricey without costing much at all!
I tear out the inner crotch seam, flatten the panels, then sew the front and back together with right sides facing.
After that, I stitch the bottom, pinch the corners if I want a boxy base, and use the waistband as the flap frame.
Add simple denim flap hardware, a short strap, and finish with zigzag edges.
My liningless finishing tips keep it clean!
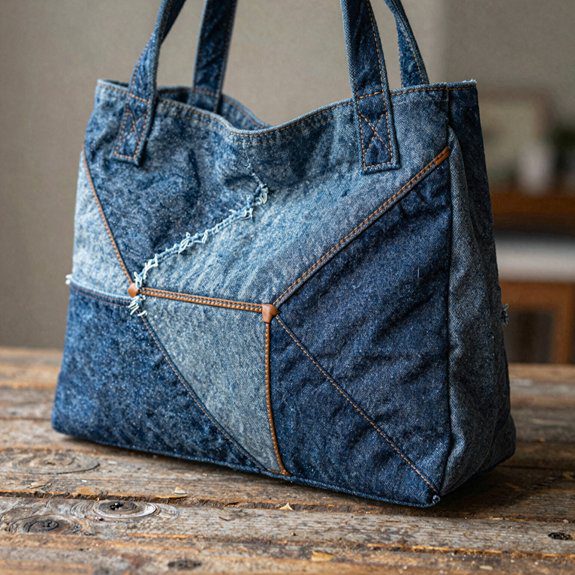
Patchwork Denim Handbag with Mixed Fabrics
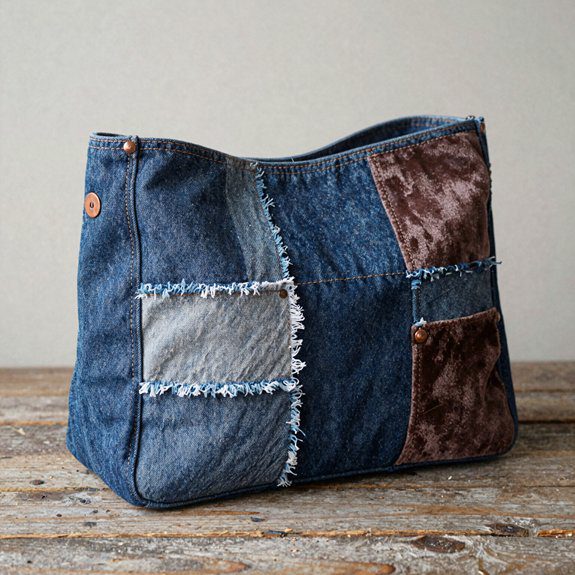
When I want a patchwork denim handbag that looks handmade in the best way, I start by grabbing two to four sturdy pairs of old jeans and mixing them with one or two contrast fabrics, like chambray, cotton canvas, or even a striped cotton that brings a little happy punch.
| Step | What I do |
|---|---|
| Cut | Make 6–10 in panels |
| Flatten | Remove crotch seams |
| Strengthen | Add fusible backing |
| Sew | Use 1/4–1/2 in seams |
| Finish | Zigzag edges, then add a pocket |
That’s Sustainable Upcycling with real Customer Appeal! I keep one jean pocket visible, and I’ll sometimes add denim webbing for a neat handle feel. The mixed textures look fresh, cost little, and the bag feels sturdy, not sloppy. Pretty clever, right?
Drawstring Denim Backpack Style Bag
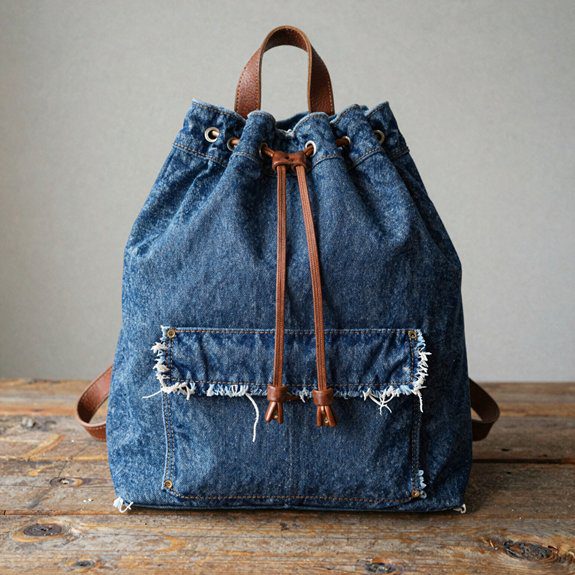
If you liked the patchwork look, this drawstring denim backpack takes old jeans in a more sporty direction, and it’s way easier to wear on the go!
I cut two pant-leg panels, flatten the crotch seam, and sew them right sides together, so the bag already feels like part of the group.
- Stitch the side seams with zigzag.
- Reinforce the bottom for real strength.
- Fold a 1-inch hem to make the drawstring channel.
- Add waistband trim, plus a patch pocket or zipper add on if you want extra style.
I like pinching the base into a boxed shape, because it stands better and sells better, too.
Best part? It’s cheap, beginner-friendly, and gives your old jeans a fresh, friendly second life!
Mini Denim Purse for Essentials
Tucked inside a pair of old jeans, I can turn the waistband into the cutest little mini denim purse for necessities, and honestly, it’s a tiny win with big charm! I pick sturdy denim, keep the waistband as a built-in frame, and cut both legs to the same height so the shape feels neat and friendly.
Next, I remove the inner crotch seam, trim the curves flat, and sew the panels right sides together. Then I stitch the bottom, pinch the corners if I want a snug base, and add patches over any rips for reinforced seam strength.
For the finish, I love denim zipper finishing, because sewing around the old zipper or fly flap gives it that polished, shop-ready look. Cute, cheap, and easy—what’s not to like?
Large Denim Beach Bag Idea
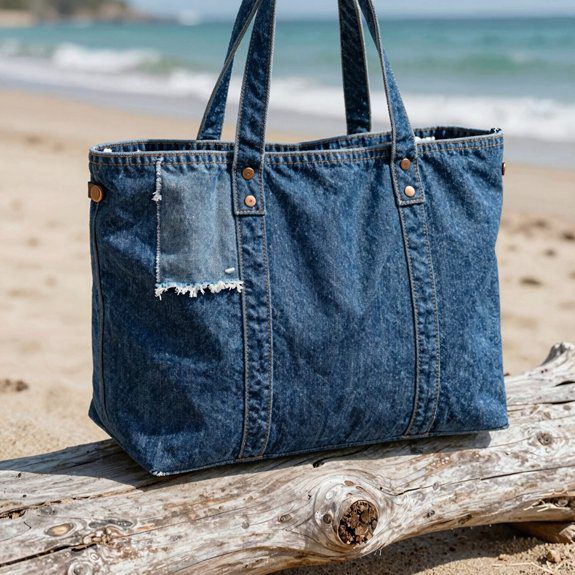
For a big beach bag that can haul towels, sunscreen, snacks, and probably half the sand on the shore, I start with a pair of old jeans that still has sturdy denim and strong stitching where the stress will hit.
Then I do this:
- Cut both legs the same length.
- Use the leftover denim for wide front and back panels.
- Tear the inner crotch seam, trim the curves, and shape flatter sides.
- Sew a rectangular body, add a reinforced bottom panel, and keep the zipper fly pocket for keys or lip balm.
I love this build because it feels friendly, useful, and easy to sell, too! The bag opens wide, holds plenty, and still looks cool on the sand. Best part? It’s beginner-friendly, costs almost nothing, and gives old jeans a second life with real beach-day bragging rights.
Structured Denim Bag with Lining
On a structured denim bag, I like to start with jeans that still have some muscle in them, because that sturdy fabric gives the bag its shape without a lot of extra help.
I cut two matching panels from the front and back, keep the waistband on, and stitch a flat bottom, so the bag stands up like it knows it belongs in the room!
Next, I rip out the inner crotch seam, trim that curved area into a neat rectangle, and make a lining pattern from the bag body.
I sew the lining separately, then join it cleanly, which keeps the inside from looking shy.
For strength, I finish stress points with zigzag stitches, check interfacing options, and play with topstitch placement near the upper edge.
That last step locks everything in and gives the bag a polished, sellable feel!
Denim Laptop Sleeve Bag
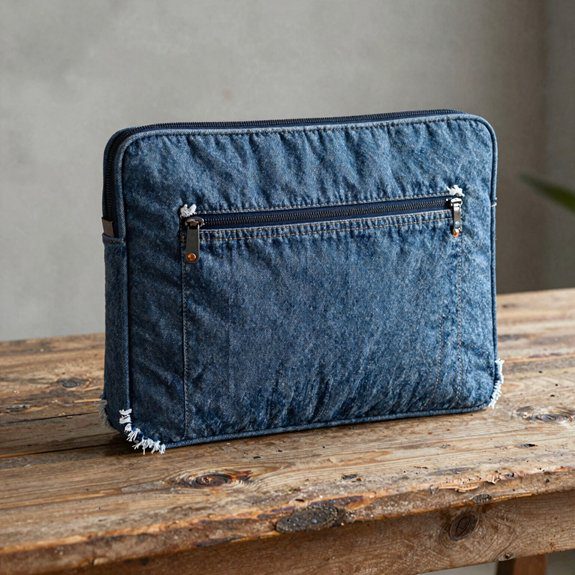
If you liked the sturdy feel of that denim bag, this laptop sleeve idea takes the same old-jeans magic and turns it into something sleek, snug, and super practical!
I grab old jeans, keep the waistband as the top edge, and cut the legs into panels, plus a pocket lining if I want extra care inside.
- Measure your laptop, adding 1–2 cm.
- Trim the crotch curve so the panels lie flat.
- Sew sides with reinforced stitching.
- Finish the base, and keep the fly or zipper area as a smart closure.
I like a snug wrap, not a bulky tote, because it slides into a backpack like it belongs there.
Patch any worn spots, and suddenly you’ve got a clean, durable sleeve that feels made for your crew!
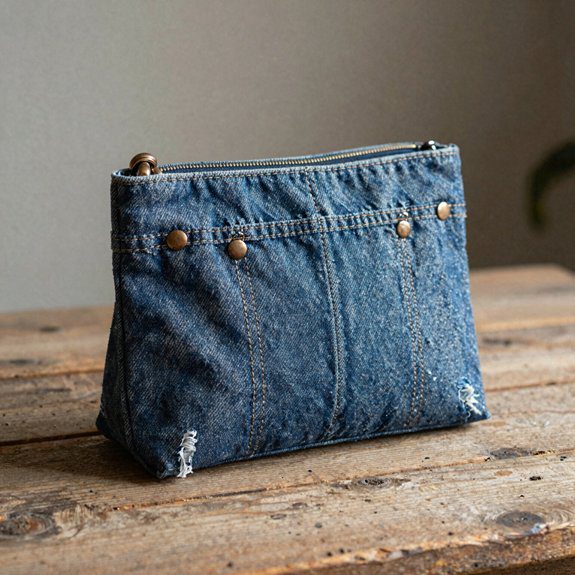
Foldover Denim Clutch Bag
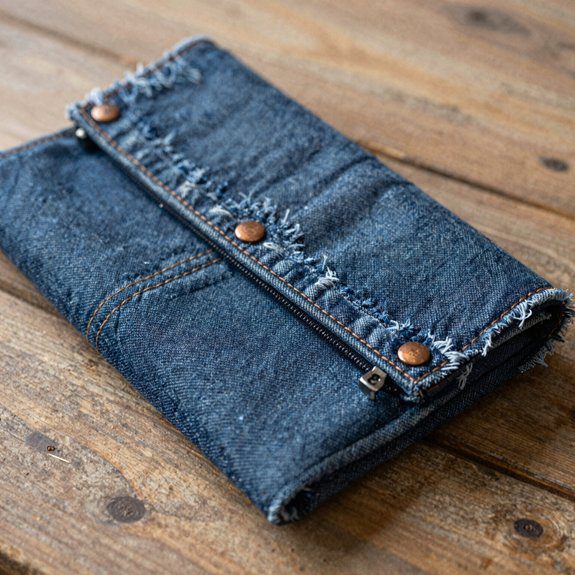
While the laptop sleeve kept things sleek and snug, this foldover denim clutch is where old jeans really get to strut their stuff!
I take two leg panels, trim them to the same width, and flatten the crotch curve so the front and back look neat and symmetrical.
Then I leave a 5–8 inch flap from one leg, stitch the sides, and suddenly I’ve got that cool foldover mouth that feels sturdy in my hand.
For repairing denim seams, I add interfacing or a small patch at weak spots, especially near the fold.
Last, I hide a snap or magnetic clasp 1–2 inches from the edge, and I either close the fly or zip it shut.
My favorite magnetic clasp tips? Keep it centered, and boom—store-ready chic!
Reversible Denim Fabric Bag
Here’s my easy game plan:
- Cut the legs into front and back panels.
- Tear out the crotch seam, then trim the curves flat.
- Sew right-sides together, leaving a small opening for turning.
- Press everything, then add patches, double stitching, and a fly or pocket closure.
I use a smart denim panel layout and careful reversible seam finishing, so both sides feel polished.
The result? A tough, sellable bag that looks like it belongs in your circle, not in a rescue pile!
Denim Bucket Bag with Soft Shape
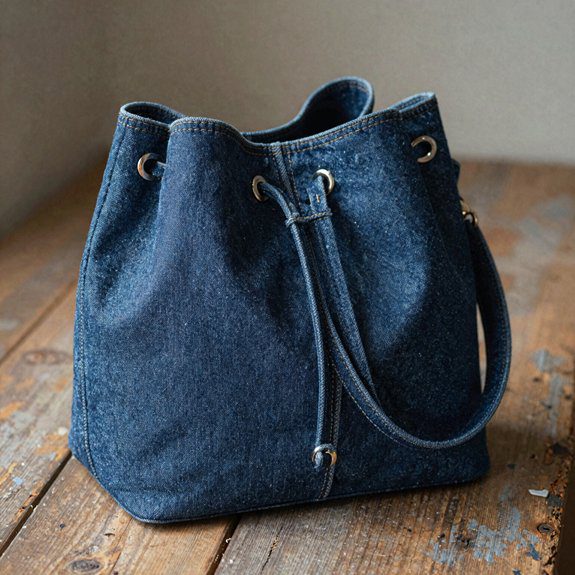
For a denim bucket bag with a soft shape, I like starting with two old jeans and letting the fabric do the fun part! I cut the legs into front and back panels, open the crotch seam, and trim it so the body lies mostly flat. Then I keep the waistband and zipper section as the top ring, which gives the bag a cozy, sturdy edge.
| Step | What I use | What it does |
|---|---|---|
| Cut | Jeans legs | Makes panels |
| Shape | Crotch area | Softens drape |
| Finish | Drawstring | Adds bucket pull |
I sew the side seams with a zigzag finish, add a bottom circle, and topstitch for strength. Want flair? Try upcycled hardware options and lining fabric choices. It looks polished, costs little, and feels like a club for clever makers!
Jeans Pocket Bag with Multiple Compartments
When I want a denim bag that actually helps me stay organized, I start with jeans that still have lots of pockets—coin pocket, front pockets, back pockets, the whole crew!
I cut around each pocket bag, keep the openings facing out, and do Pocket Reinforcement with topstitching so nothing sags.
Try this:
- Put big pockets on the front for a phone.
- Use back pockets for notebooks or wallets.
- Add a denim divider inside for small tools.
- Finish with Edge Finishing and tight corners for a sellable look.
It’s cheap, beginner-friendly, and honestly, it feels like your jeans joined the team.
The best part? Each item gets its own home, so you’re not digging around like a raccoon at snack time!
Denim Belt Bag for Casual Use
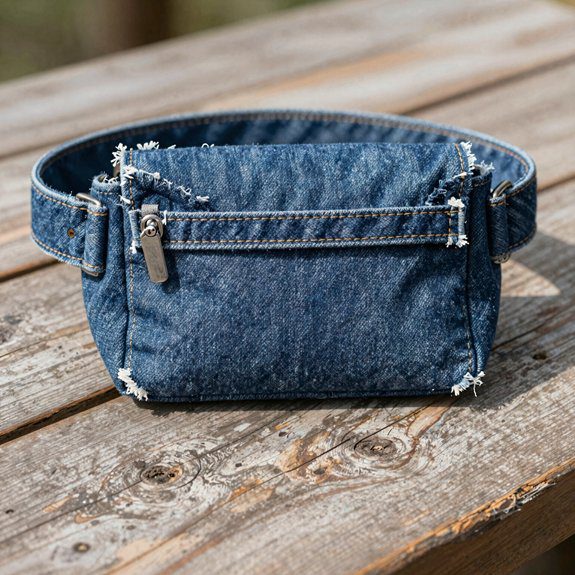
If I’ve already got jeans with pockets doing the hard work, I like to take the next step and turn a sturdy pair into a denim belt bag for easy, hands-free wear.
Pick jeans with a strong waistband and good belt loops, then cut a 6–9 inch rectangle from that section.
I tear out the crotch seam, flatten the denim, and trim the curve so the panel folds into a neat little pouch.
A zipper fly can stay put, or I sew the top closed for a simple finish—easy, right?
For denim sizing tips, I test the fit before stitching the sides and bottom with topstitching and zigzag edges.
My favorite part? Adding sturdy strap options, like belt-loop tabs or reinforced strips, so you can wear it as a fanny pack or swing it cross-body.
Quilted Denim Bag Design
I love turning old jeans into a quilted denim bag because it looks way fancier than the effort it takes! If you’ve got a few pairs hiding in the closet, you’re already halfway there, friend.
- Pick two blue tones, cut 2–3 inch strips, and piece a neat front panel.
- Add cotton batting as quilt backing, or fusible fleece, then stitch straight lines or X’s with steady stitch spacing.
- Use seam allowances, belt loops, or yokes inside the sandwich, so the bag stays firm.
- Finish edges with bias tape or a skinny denim strip, topstitch close, then shape flat corners.
That little extra bulk? Totally worth it! A zipper or reinforced straps keeps it strong, and the final bag feels handmade, sturdy, and ready to join your crew.
Denim Travel Organizer Bag
For a denim travel organizer bag, I like starting with a pair of sturdy old jeans that still have a solid waistband and strong seams, because that’s the biggest battle right there!
I cut the legs into matching panels, patch any weak spots, then rip out the inner crotch seam so the front and back lie flat for easy travel storage.
Next, I sew the pieces right-sides facing, finish the edges, and add a strong base seam.
Then I use the original pockets and leg seams for organizer design ideas, making spots for chargers, toiletries, socks, and compact must-haves.
For extra flat bottom stability, I pinch the corners before stitching.
It’s beginner-friendly, cheap, and honestly, it looks like something your travel crew would totally borrow!
Simple Market Bag from Old Jeans
A simple market bag from old jeans is one of those projects that looks way fancier than it really is! I grab sturdy denim, cut the legs to equal length, and work around the zipper by sewing the fly flap shut so the top stays neat.
- Remove the crotch seam and flatten the panels.
- Sew right sides together, then close the bottom.
- Pinch the corners for a flat base.
- Add reinforced top stitching and zigzag seams.
These Sewing durability tips help the bag hold groceries without sagging, and they keep fraying in check. I like that it feels like a little club of makers who know thrifted fabric can still shine.
The result? A sellable, everyday tote that’s tough, clean, and ready for the market!